
1.4 – WED’s Grid System
You will notice that the three orthogonal views (Top, Back and Side) have a grid displayed within them. If you look carefully at the grid you will notice that something is a little strange about it. Look again if you haven’t noticed it yet. Got it now? There are only eight smaller grid boxes to each larger gird box:
Why only eight? I thought we used base-ten for everything? There is a particular reason for only eight grid squares and it has to do with some particulars of real-time 3D game creation. Real-time 3D games require textures to be sized in a power of two such as 8, 16, 32, 64, 128, 256, 512, 1024, 2048, etc. A texture sized at 135 pixels along a side would be invalid. This being the case WED’s grid system adheres to the same power of two principle. Having eight smaller grid squares to a larger grid square keeps everything in a power of two.
You will also notice that Gamestudio uses a strange unit of measure. Instead of using inches or centimeters, Gamestudio uses the Quant. The quant is an arbitrary unit of measure when it comes to the creation of your world, but it has a very specific meaning when it comes to textures. Each quant is equal to one (unscaled) pixel in your real-time 3D world. This is incredibly helpful when it comes to texturing your 3D level geometry and we will talk about that in just a minute.
If you have not changed WED’s default values then each smaller grid square will be exactly equal to 16 quants and there are eight of these to each larger grid square. Now we can develop a simple equation based on what we know about WED’s grid system:
16 quants per smaller grid square X 8 smaller grid squares = 128 quants
Remember that we said each quant was equal to one pixel? Well now we have something to work with! If each larger grid square is 128 quants on a side and each quant is equal to one pixel then each larger grid square is also 128 pixels in length! But what can we do with this information? We can perfectly texture our level geometry, that’s what we can do.
Let’s use an example to help out. In WED create a Medium cube and position it so that one of its corners is in the center of the world coordinate system (where the two greenish lines cross):

Now find and apply a 128 x 128 pixel texture to the cube:
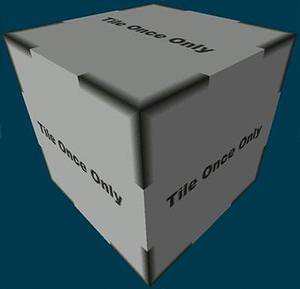
You will notice that the texture perfectly covers each face of the cube without repeating even once. Understanding WED’s grid system and the concept of the quant will help you to be able to perfectly texture your level geometry each and every time. You will see this when we get into the actual level design tutorial.
You may have a question or two about WED’s world coordinate system which I mentioned above. This system basically helps keep track of every 3D object and each vertex (point) that you create. For example, the point where the greenish lines cross is 0,0,0 in the coordinate system. A dot placed at that point would be zero quants from the center in all three directions (X, Y and Z). Therefore if a point was at 10,10, 100, then it would be located at X=10, Y=10 and Z = 100. Maybe this is a little too abstract, so let’s break this down and make it simple. Instead of talking about a 3D world let’s resort to a 2D world using graph paper. I am sure you will remember stuff like this from geometry ? .
Let’s say you have a sheet of graph paper with 10 squares going up and 10 squares going across. The teacher tells you to locate and color the square that is five squares over and six squares up. If “over” is “X” and “up” is “Y” then the square you color would be located at 5,6 (X=5 and Y=6). Using this method you can describe the location of any given square on your 2D grid.
This works the same way in your RT3D world only in 3D (thus the introduction of “Z”) and this system is used to locate each and every object placed in your 3D world. This system is even used for determining how your textures are placed on your geometry.
Any texture added into your world begins at the world origin by default no matter where your geometry is placed. By default textures actually tile infinitely in all directions beginning at the world origin (0,0,0). This is why I had you place the Medium cube with one corner in the world coordinate center. It ensured the texture you applied would start at that corner and, if it was a 128 pixel by 128 pixel texture, it would tile perfectly on your 128 quant by 128 quant by 128 quant cube.
You may notice that I said textures tile infinitely from the world center by default. I used those words on purpose because you can always change a default. Textures applied to geometry in WED can be slid along a face in order to place it exactly where you want. Still, having an understanding of how WED works when it comes to its measuring system (and how textures interact with your 3D world) will go a long way in helping you to create the level geometry you want and to precisely texture it.
Return to Part 1.3 - Working with WED's Views
Go to Section 2 - Plotting and Planning