4.2– Using Texture Scaling
After reading the previous section you may be asking, “How can using a bigger texture look better? I thought one quant was equal to one pixel?” Well, if you were thinking this then you are right. But we can bend the rules from time to time and actually squeeze more than one pixel into a quant. We do this by scaling the texture. How you scale a texture will depend on whether the texture is already applied to level geometry or not.
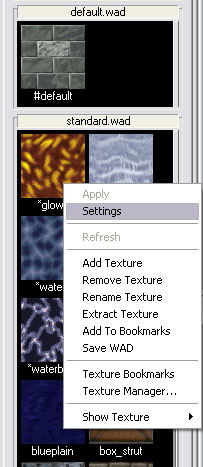
If the texture is not applied to level geometry then you simply need to access the textures settings by right clicking on the texture in the texture view to the left and selecting “Settings”:
Then a panel will pop up that looks like this:
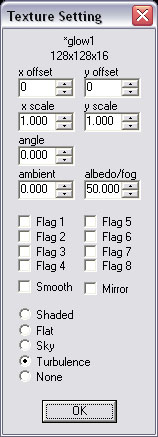
You will notice two text entry fields labeled “x scale” and “y scale”. Each one, by default, has 1.000 entered into the field. This means the texture is scaled by one. Increasing this number will increase the size of the texture. For example, if you change 1.000 to 2.000 then you will effectively double the size of the texture. In this case, if a texture is 128 pixels by 128 pixels then it will actually fill up a 256 pixel by 256 pixel space. Increasing the size of a texture will cause the texture to fill more space, but it will also make each pixel of the texture larger as well. If you recall, one quant equals one pixel ... or should I say, one UNSCALED pixel. Scaling the texture by 2.000 will change the equation so that one quant will equal one-half of a pixel. This will make the individual pixels of a texture very visible to the player.
On the other hand, if you scale a texture down then the inverse happens. A texture scaled by 0.500 is half the size. Therefore a 128 pixel by 128 pixel texture will only occupy 64 pixels along an edge before it tiles. This also means that you have shoved two pixels into every quant. Twice as many pixels in a quant makes the texture clarity twice as clear. In other words, the pixels appear closer together in the 3D world and the eye sees blends them together better. Not only that, but textures scaled down will look better when viewed up close.
Now you may be thinking, “Hey! I will just scale down all of my textures!” And while this is a very tempting thought, it is not always the wisest thing to do. Consistently using scaled down textures means you are using textures larger than needed. This means you are using more valuable video memory than necessary and this can lead to problems with your games performance. You have to use a bit of RT3D wisdom when deciding to use scaled down textures as they should not be used on each and every piece of level geometry in your level.
Later on, in the section on lighting you level (Part 5) we will reveal another secret about scaling textures. So this will be yet another thing you will have to consider when choosing the size of your textures.
Return to Part 4.1 - Bigger is Not Always Better
Go to Part 4.3 - Color Coodinate Your Textures