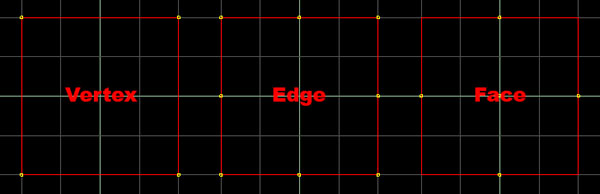
Sometimes we need to create a shape that is not a standard block shape. This will be done by moving an objects vertices (the little points where wires meet up), edges (the wires themselves) and faces (the spaces between the edges and vertices).
You can access an objects vertices, edges or faces by using the following buttons on WED's toolbar:

Here we need to take a break and talk about a current restriction in WED and Gamestudio in general. Understanding this restriction can save you a lot of headache in the future. Currently Gamestudio is a BSP (Binary Space Partition) based engine. BSP has many advantages and a few disadvantages as well. It is not the purpose of this tutorial to discuss the pros and cons of BSP, but to make you aware of some restrictions imposed upon you by BSP as you build you levels.
BSP does not allow you to use CONCAVE surfaces. I am sure that there are many out there that are not familiar with this term. Here is how one dictionary defines CONCAVE:
Curved like the inner surface of a sphere.
Someone once said to think of the word CONCAVE by looking at the last part of the word, “cave”. A cave is sort of a large indentation into the face of a hill or mountain. Therefore CONCAVE is when there is a cave-like dent in the surface of your geometry. This sort of surface is not allowed in systems that use standard BSP, such as Gamestudio.
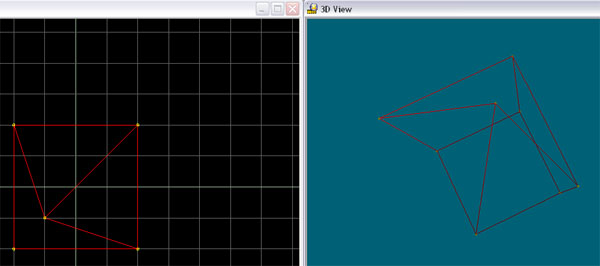
Now you may be asking yourself, how can I create some of the surfaces I need to if I am restricted in such a way? What you will have to do is use several, non-concave surfaces combined together to recreate the one concave surface you want to create.
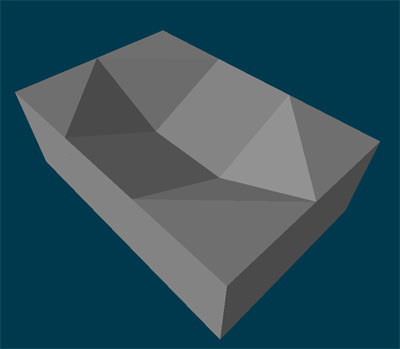
You will need to keep this in mind when working with a geometry's vertices, edges and faces because it is very easy to inadvertently create a concave surface. Not to worry, though. WED will warn you when you create a concave surface. Sometimes you create a concave surface on the way to creating a non-concave surface. If this is what you are trying to attempt, then simply select the ignore button. If not, then click OK and move on. WED will return your geometry to its original shape and you can try something else.
Now that we understand a very important WED/Gamestudio restriction, we can begin using these various forms of geometry manipulation in order to create the types of surfaces we want. Combining this knowledge along with snapping to the grid will save us a lot of trouble as we go about creating our level geometry. Future versions of WED will include a new feature called VERTEX SNAPPING. This will make WED even more powerful as you will not only be able to snap objects, vertices, edges and faces to the grid, but also to the vertices of other objects. This will allow you to perfectly align your objects with other objects. This feature is currently in beta and may even become available when this tutorial is released.
Now we have some ideas on how to begin building the actual 3D space but now we need to make it look like something other than plain, white plastic (and we certainly don't want to use WED's default texture, do we). So let's move on to the next part of the tutorial and talk about texturing.
Return to part 3.4 - Rotating
Go to Part 4 - A Picture is Worth a Thousand Words